In short: The experts who looked at the hillside behind the Living Springs Log House agree a retaining wall would be good someday. It isn’t urgent. This article covers what kind of wall to choose, why terraces often beat one tall wall, a do-it-yourself method, and when to call a professional. Start with Caring for a Steep Hillside Behind Your House for what to do now.
These are suggestions, not professional advice. See the full note at the end.
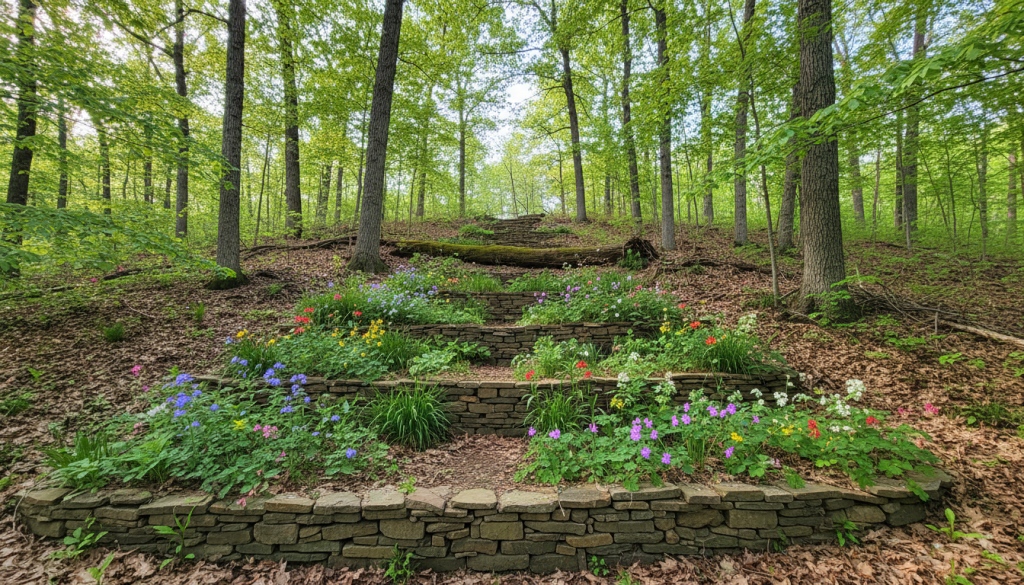
A wall here should not go on the patio, and it should sit back from the house, away from the foundation. Here is what to know when the time comes.
Choose the Right Kind of Wall
Most homeowner walls are gravity walls, meaning they hold the slope back by their own weight and by leaning slightly into the hill. Common options:
- Segmental concrete blocks. The interlocking blocks sold at home centers and landscape suppliers. They have a built-in setback, are designed for drainage, and are the most forgiving choice for a do-it-yourselfer.
- Dry-stacked natural stone. Ozark fieldstone and limestone are plentiful, beautiful, and naturally drain through the gaps. Stone from the property itself can be used. Building with stone takes patience and a good eye, and the stones are heavy, but the result looks like it belongs to the land.
- Timber. Inexpensive and easy to build, but wood rots in our humid climate, often within 15 to 20 years. Treated timbers also raise concerns near vegetable gardens.
- Gabions. Wire baskets filled with rock. Very good at draining water and handling wet slopes, with a rustic look.
- Poured or reinforced concrete. Strong and permanent, but this is professional territory, requiring footings, steel, and engineering.
Consider Terraces Instead of One Big Wall
On a steep slope, two or three short walls stepped up the hill are almost always better than one tall wall. Each wall holds back less weight, and shorter walls are within reach of a homeowner. The level beds between them make wonderful planting spaces for herbs, flowers, and pollinator plants, so the terraces become gardens as well as erosion control. As a rule of thumb, set the terraces back from each other at least twice the height of the lower wall, so the upper wall isn’t pressing down on the lower one.
Can You Do It Yourself?
Yes, often. A homeowner with a strong back, some help, and patience can build a sound wall if all of these are true:
- The wall will be under about 3 to 4 feet tall, measured from the bottom of the buried first course to the top.
- There is nothing heavy above it, such as a driveway, building, shed, vehicles, or another wall close behind it.
- The soil is reasonably stable, with no signs of the hill already moving.
- There’s no active spring or constant seep in the slope.
- Digging the base won’t undermine the house foundation or the patio slab.
The Basic DIY Method (Segmental Block Wall)
- Call 811 before you dig. In Arkansas, Arkansas One Call will mark buried utility lines for free. It’s the law, and it protects you.
- Lay out the wall with stakes and string. Curves are stronger and more attractive than long straight runs.
- Dig a trench wide enough for the block plus about a foot of gravel behind it, and deep enough to bury the first course (roughly one inch of burial for every eight inches of wall height, and at least six inches).
- Build a compacted base of about six inches of crushed gravel, tamped firm and perfectly level. This step matters more than any other. A wall is only as good as its base.
- Set the first course carefully, checking level block by block.
- Lay perforated drain pipe at the base behind the wall, wrapped in or surrounded by filter fabric, sloped so it carries water out to open ground at one end, away from the patio and house.
- Stack the courses, staggering joints like brickwork. Most blocks have a built-in lip that sets each course back into the hill.
- Backfill with clean drainage gravel (not soil) for at least 12 inches behind the wall, compacting as you go. Put filter fabric between the gravel and the native soil so mud doesn’t clog it.
- Cap the wall and finish the top few inches with soil so you can plant.
Taller block walls also need geogrid, a reinforcing mesh laid between courses and stretched back into the hill. If your wall needs geogrid, you’re already at the point where professional input is wise.
When to Call a Professional
Bring in help if any of these apply:
- The wall will be over 4 feet tall. Building codes widely used in the U.S. call for engineered design on walls of this height, and the forces involved go up dramatically with each added foot.
- The slope is already moving: cracks in the ground, trees leaning downhill, bulges, or slumped soil.
- There’s a spring, seep, or constantly wet ground.
- The patio or house shows stress: cracks in the slab, settling, a damp basement or crawl space, or doors that have started to stick.
- The wall would sit close to the foundation, or digging would remove soil that supports the house or patio.
- Something heavy sits above the slope, such as a driveway, outbuilding, or road.
- The soil is heavy clay or the slope is very steep (steeper than about one foot of rise for every two feet of run).
Who to Call
- Your county Extension office or conservation district, and the USDA Natural Resources Conservation Service (NRCS). They often give free advice on erosion, drainage, and native plantings. This is a wonderful first stop.
- A geotechnical or civil engineer for tall walls, unstable slopes, or groundwater problems. Many will do a single site visit and give recommendations.
- An experienced hardscape or retaining-wall contractor. Ask how many walls they’ve built, whether they install drainage and geogrid, and if you can see a wall they built several years ago.
- Your local building or planning office, to ask whether a permit is required. Rules vary a great deal between towns and rural county areas.
The Middle Path: Consult, Then Build
You don’t have to choose between doing everything yourself and handing the whole project over. Many homeowners get the best of both by paying for a one-time consultation with an engineer or experienced contractor, getting a clear plan for drainage, wall height, and materials, and then doing the labor themselves or with friends. A few hours of expert advice costs far less than rebuilding a wall that failed, or repairing a foundation that water found its way into.
The Bottom Line
When the time is right, a short wall or a set of terraces can turn the slope into one of the loveliest parts of the home: a terraced garden rising above a dry, peaceful patio.
A note on these suggestions: The repairs and improvements described here are our best understanding from research and our own experience living on the property. We are not contractors, engineers, or licensed inspectors, and these may not be the best or only solutions. Before starting any repair or project, please consult a qualified professional, such as a contractor, drainage specialist, or home inspector, who can look at the site in person.
How we wrote this together: This article was written collaboratively by Patricia Mikkelson, a resident of the Living Springs Log House, and Claude.ai, Anthropic’s AI assistant. Patricia brought what the Madison County Extension specialist and two retaining wall experts told her. Claude researched wall-building practices and helped put it all in order.
To see more of the Living Springs Log House and its land, visit www.livingspringsloghouse.com


[…] near the patio is the roof, not the hill. This article covers simple, low-cost steps to take now. A second article covers building a retaining wall […]
LikeLike
[…] forest, roughly half of it on sloping hillsides. Read more: Caring for a Steep Hillside, Building a Retaining Wall on a Steep Hillside, and Forest […]
LikeLike