Part 6 of the Living Springs Log House Improvement Checklist
In short: The screws on a metal roof wear out long before the metal does, and replacing them is one of the most do-it-yourself-friendly roof repairs. This article covers safety first, then the tools, the steps, and the cost.
These are suggestions, not professional advice. Click here to read the full note.
The repairs and improvements described here are our best understanding from research and our own experience living on the property. We are not contractors, engineers, or licensed inspectors, and these may not be the best or only solutions. Before starting any repair or project, please consult a qualified professional, such as a contractor, drainage specialist, or home inspector, who can look at the site in person.
A metal roof can last 40 years or more, but the screws that hold it down usually wear out long before the metal does. Each screw has a small rubber washer under its head. Over time, sun, heat, and cold make those washers crack and shrink, and screws loosen as the metal expands and contracts every day. That’s how small leaks start.
The good news: re-screwing a metal roof is one of the most do-it-yourself-friendly roof repairs there is. It takes no special skill, just patience, the right screws, and a serious commitment to safety.
First, Safety, Because It Matters Most
Falls from roofs are among the most common causes of serious home-repair injuries. A high or steep roof is not a reason to give up on doing it yourself, but it is a reason to do it the right way.
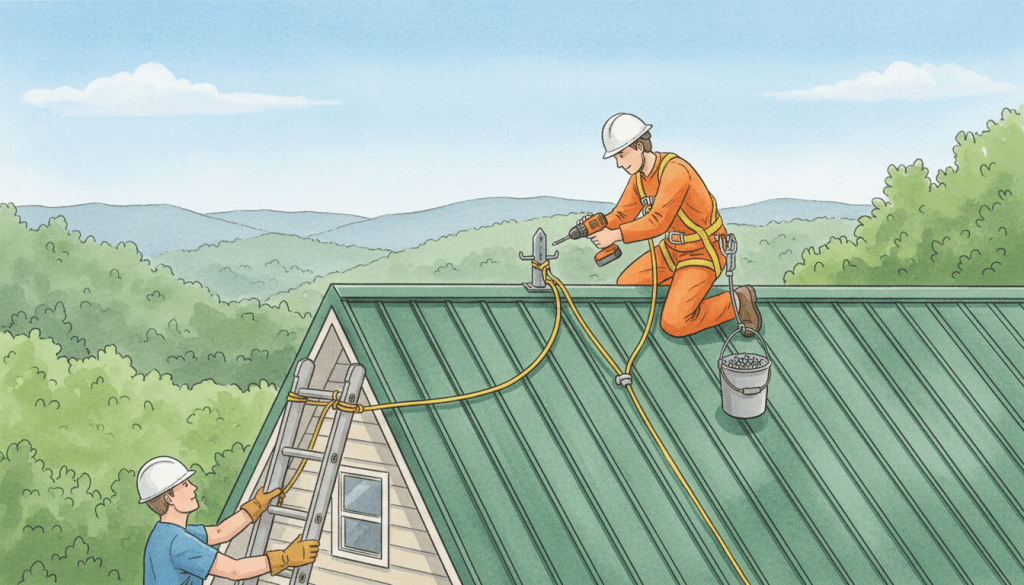
- Never work alone. Have a helper on the ground who can hand up supplies, steady the ladder, and call for help if needed.
- Use a fall-arrest system on any roof you can’t comfortably walk. That means a full-body harness, a rope with a rope grab, and a roof anchor screwed securely into a rafter. Roofing safety kits that include all three are sold at home improvement stores and are not expensive compared to an injury.
- Work only on dry, mild, calm days. Metal roofs are very slippery when wet, dewy, or frosty, and they get dangerously hot in summer sun. Morning dew can linger, so wait until the roof is fully dry.
- Wear soft rubber-soled shoes with good grip.
- Set the ladder properly. Extend it at least three feet above the roof edge, set it at a safe angle (about one foot out for every four feet up), and tie it off at the top.
- Step only where the roof is supported. Walk on the flat parts near the screw lines, where the metal sits on the purlins or decking underneath, not in the middle of an unsupported span.
- For very steep roofs, roof brackets or a ladder hooked over the ridge can give you safe footing.
If the roof is very steep, very high, or you feel uneasy at any point, it’s wise to hire a roofer for that section, or just for setting up the anchor. There’s no shame in getting help with the dangerous part and doing the rest yourself.
Tools and Supplies
- New gasketed roofing screws that match your roof color. Most metal roofs use #9 or #10 screws; buy the next size up (such as #12 or #14) for holes that have become stretched or stripped.
- A cordless drill or impact driver with a clutch, plus a magnetic hex driver bit to fit the screw heads (usually 1/4 inch or 5/16 inch).
- Extra batteries, fully charged.
- A tool belt or bucket on a rope to haul things up.
- Butyl or metal-roof sealant for small holes and seams.
- A chalk line or marker to keep track of which rows you’ve finished.
- Gloves to protect your hands from sharp metal edges.
To estimate how many screws you need, count the screws in one panel and multiply by the number of panels. Buy about 10% extra, since a few will always drop off the roof.
Step by Step
- Inspect the roof first. From the ladder or a safe spot, look for screws that are loose, backed out, missing, or rusted, and washers that are cracked or flattened. Look for rust stains around screw heads, which often show where water is getting in.
- Work in one small section at a time. Start at one edge and move across in rows so you never lose track.
- Remove one old screw at a time. Back it out with the drill set to reverse.
- Put in the new screw right away, in the same hole. If the hole feels loose and the screw won’t grip, use the larger size.
- Tighten it just right. This is the most important skill. The rubber washer should be snug and slightly compressed, with a small edge visible around the metal washer. Too loose, and water gets in. Too tight, and the washer splits or the metal dimples, which also leaks. Set your drill’s clutch low and practice on a few screws until you get the feel.
- Drive screws straight, not at an angle, so the washer seals evenly.
- Seal any extra holes. If you find holes where a screw missed the framing underneath, put in a screw with a washer anyway, or fill the hole with sealant.
- Check flashing and ridge caps while you’re up there. Those screws loosen too.
- Sweep away metal shavings before you climb down. Little bits of metal rust and stain the roof.
How Long Will It Take?
On an average house roof, a careful person with a helper can usually re-screw a few hundred square feet in a day. A larger roof may take several mild weekends. There’s no need to rush. Take breaks, drink water, and get off the roof before you feel tired. Most accidents happen when people are tired or hurrying to finish.
What It Costs
For the cost of screws, sealant, and a safety kit, you can often save a large share of what a roofer would charge, and add many more years to the roof’s life. A re-screwed metal roof can stay watertight for another 10 to 20 years before the washers need attention again.
A Gentle Reminder
Caring for a home is a way of stewarding what we’ve been given. Doing it carefully, with a friend, on a beautiful clear day, can even be a joy. Be safe, take your time, and enjoy the view from up there.
A Few Insights
- The screws almost always wear out long before the metal does, so a little care every so often can keep a good roof going for decades.
- The real work of this job is setting up safely. Once you are anchored in, the re-screwing itself is simple and steady.
- There is no shame in hiring help for the riskiest part and doing the rest yourself.
Related articles
How We Wrote This Together
This article was written together by Patricia Mikkelson, a resident of the Living Springs Log House in the Ozark hills of Arkansas, and Claude.ai, an AI assistant made by Anthropic. Patricia brought the topic, since re-screwing the metal roof is one of the jobs on the log house list, and Claude gathered the steps and safety practices and put them into plain words. We worked back and forth until it read clearly. The illustration was created with AI.
The Living Springs Log House Improvement Checklist
- Part 1: Catching the Rain
- Part 2: From Cedar Thicket to Sanctuary Pasture
- Part 3: Water and Shelter for a Sanctuary Pasture
- Part 4: Rocket Stoves for Heat and Cooking
- Part 5: Rocket Stoves Beyond the House
- Part 6: Re-Screwing the Metal Roof, Safely (this article)
- Part 7: Staying Cool Without Air Conditioning
- Part 8: Staying Cool, Room by Room
- Part 9: Caring for the Cypress Siding
- Part 10: Forest Mulching
- Part 11: Small Gaps, Honest Fixes
- Part 12: A Quieter Log House: Soundproofing
For more from the land, visit www.livingspringsloghouse.com


[…] Part 4: Re-Screwing the Metal Roof, Safely […]
LikeLike
[…] Part 4: Re-Screwing the Metal Roof, Safely […]
LikeLike
[…] Part 4: Re-Screwing the Metal Roof, Safely […]
LikeLike
[…] Part 4: Re-Screwing the Metal Roof, Safely […]
LikeLike
[…] to hire a professional for the riskiest sections and do the reachable parts yourself. Our article How to Re-Screw a Metal Roof Yourself (Even a High One), Safely covers ladder […]
LikeLike
[…] Part 4: Re-Screwing the Metal Roof, Safely […]
LikeLike
[…] Part 4: Re-Screwing the Metal Roof, Safely […]
LikeLike
[…] Peak height of 17 feet at the center. Read more: How to Re-Screw a Metal Roof Yourself, Safely […]
LikeLike
[…] Part 6: Re-Screwing the Metal Roof, Safely […]
LikeLike
[…] Part 6: Re-Screwing the Metal Roof, Safely […]
LikeLike
[…] Part 6: Re-Screwing the Metal Roof, Safely […]
LikeLike
[…] Part 6: Re-Screwing the Metal Roof, Safely […]
LikeLike